Why Every Homeowner Needs a Reliable roof installation blog
If you landed on this roof installation blog, here is what you need to know right away:
The key steps in a professional roof installation:
- Inspection and planning – assess the existing roof and deck condition
- Permits – obtain required building permits before work begins
- Tear-off – remove old shingles and flashing down to bare deck
- Deck repair – replace any soft, rotted, or damaged sheathing
- Underlayment and ice protection – install synthetic underlayment and ice-and-water shield
- Flashing – install new metal flashing at all penetrations and transitions
- Shingle installation – apply starter strips, field shingles, and ridge cap
- Final inspection and cleanup – check every nail, sweep for debris, document warranties
Typical timeline: 1 to 3 days for most residential homes Typical cost range: $5,500 to $22,000+ for asphalt shingles (based on publicly available data — not Twin Roofing’s actual pricing)
A new roof is one of the largest investments most homeowners ever make. Yet most people have no idea what actually happens during those one to three days when a crew takes over their property. That uncertainty leads to stress — and according to industry data, 67% of homeowner complaints about new roofs stem not from bad workmanship, but from poor communication about the timeline and disruption involved.
This guide changes that. Whether you are planning ahead, comparing contractors, or trying to understand what you just agreed to, you will find clear, honest answers here.
I’m Tom Gordon, owner of Twin Roofing, a division of Twin Metals, Inc., and with nearly two decades of hands-on experience installing asphalt roofs across Massachusetts and New Hampshire, I have seen every mistake — and every shortcut — that this roof installation blog covers. Everything in this guide reflects what we do in the field, every day, to protect homes built to last.
Roof installation blog word roundup:
Understanding the Professional Roof Installation Process
When we arrive at a job site in Arlington or Bedford, our goal is to transform your home’s defense system systematically. A professional Step-by-Step Guide to Roof Installation Process isn’t just about hammering nails; it’s about a sequence that ensures every layer works in harmony.

The process begins with the tear-off. We remove every single old shingle, nail, and piece of felt paper. This is the only way to perform a true deck inspection. We look for soft spots, water stains, or “delamination” where the plywood layers are peeling apart. If we find rot, we replace it immediately. You can’t build a 30-year roof on a 5-year deck.
Once the deck is solid, we move to Residential Roofing protection. This involves laying down the “under-layers”—the ice and water shield and synthetic underlayment. Only after these moisture barriers are secure do we begin the shingle application. We start from the bottom (the eaves) and work our way up to the ridge, ensuring proper overlaps that naturally shed water.
Essential Materials and Tools for a Successful roof installation blog
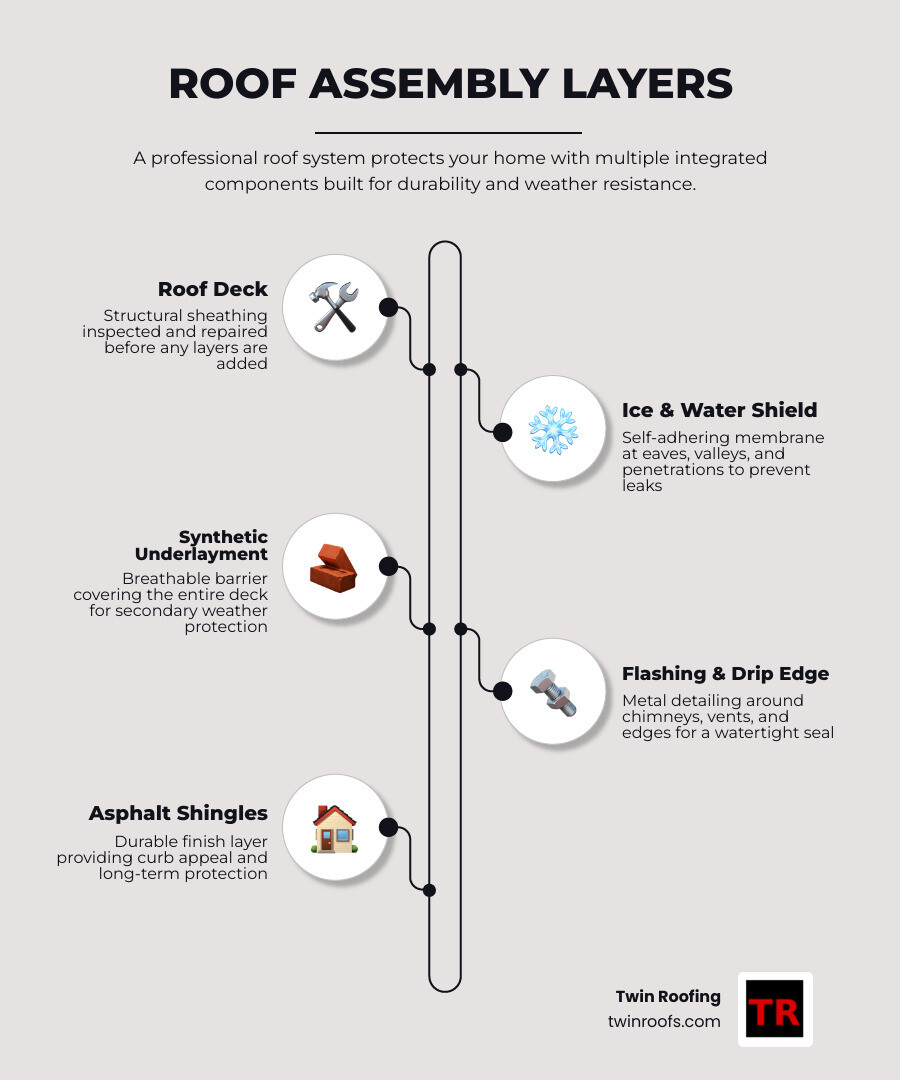
A roof is more than just the shingles you see from the street. It is a complex assembly of specialized components. If you are reading this roof installation blog to learn about the “ingredients” of a great roof, here is the essential list.

- Asphalt Shingles: The primary defense. In May 2026, architectural shingles remain the gold standard for durability and aesthetics.
- Drip Edge: A metal flashing installed along the edges of the roof to direct water into the gutters and away from the fascia.
- Ice and Water Shield: A self-adhesive, waterproof membrane. In our Massachusetts and New Hampshire climate, this is mandatory in valleys and along eaves to prevent damage from ice dams.
- Synthetic Underlayment: Modern asphalt roofing materials have shifted away from old-fashioned felt paper to tough, tear-resistant synthetic fabrics.
- Flashing: Metal pieces (usually aluminum or copper) that seal transitions around chimneys, dormers, and vents.
To get the job done, we use high-pressure pneumatic nail guns, specialized roofing shovels for tear-offs, and safety harnesses. For homeowners curious about the DIY route, How To Install a New Roof requires significant tool investment and, more importantly, the physical stamina to work on a steep incline for 10 hours a day.
Timeline and Property Preparation: What Homeowners Should Expect
Most residential roofs (3,000 square feet or less) can be replaced in one to three days. However, the total Roof Replacement Timeline from your first phone call to the final cleanup usually spans two to four weeks once permits and material deliveries are scheduled.
Preparation is where you, the homeowner, play a vital role. Here is a checklist we provide to our clients in towns like Newton and Winchester:
- Vehicle Relocation: Move your cars out of the driveway and garage the night before. This protects them from falling debris and ensures our trucks have space for the dump trailer.
- Noise Disruption: Expect noise levels between 85 and 95 decibels. It sounds like a construction site because it is one. If you work from home, you might want to visit a local coffee shop for the day.
- Pet Safety: The sound of hammers overhead can be terrifying for dogs and cats. Additionally, while we perform a magnetic nail sweep, it is best to keep pets out of the yard until the final inspection is complete.
- Neighbor Notification: It’s a courtesy to let your neighbors know about the upcoming local roof replacement. They will appreciate the heads-up about the noise and the presence of work trucks.
Full Tear-Off vs. Overlay: Choosing the Right Method
One question that often pops up in any roof installation blog is whether you can simply put new shingles over the old ones (an “overlay”). While some building codes allow for two layers of shingles, we almost always recommend a full tear-off.
An overlay might save you $1.00 to $2.00 per square foot in the short term, but it comes with heavy risks. First, it doubles the structural load on your rafters. Second, it traps heat and moisture between the layers, which can lead to premature shingle failure. Most importantly, an overlay prevents us from seeing the deck. If there is a rotted board under your old shingles, an overlay just hides the problem until your roof begins to sag.
Choosing durable roofing solutions means doing it right the first time. A full tear-off allows us to install modern ice and water shields directly to the wood, providing the best possible leak protection for the next 30 years.
Estimating Costs and Avoiding Common Installation Mistakes
Let’s talk numbers. We know cost is a major factor. Please note that the following figures are average costs based on publicly available internet data as of May 2026 and do not represent Twin Roofing’s specific pricing.
| Material Type | Estimated National Average Range |
|---|---|
| Asphalt Shingles | $5,500 – $22,000+ |
| Metal Roofing | $15,000 – $46,000+ |
| Premium Composite | $18,000 – $55,000+ |
Factors that influence these asphalt roof replacement expenses include the square footage of the roof, the steepness (pitch), the number of chimneys or skylights, and the cost of local labor in the MA/NH area.
Beyond cost, you must avoid common mistakes that can ruin a new installation:
- Ventilation Errors: If your attic can’t breathe, your shingles will “cook” from the inside out. We always ensure a balance between intake (soffit) vents and exhaust (ridge) vents.
- Improper Nailing: Shingles must be nailed in the “strike zone.” Nails that are too high or driven in at an angle will eventually cause shingles to slide off or leak.
- Reusing Old Flashing: Some contractors try to save time by leaving old chimney flashing in place. This is a massive red flag. New shingles deserve new metal.
Frequently Asked Questions about Roof Installation
What warranties are standard in a roof installation blog?
When you are hiring a roofing crew, you should expect two distinct warranties. The Manufacturer Warranty covers defects in the shingles themselves (often 25 years to a “Lifetime” limited warranty). The Workmanship Warranty is provided by the contractor and covers the actual installation. This usually ranges from 2 to 10 years. Always get these in writing before the project begins.
How do I identify poor workmanship in a roof installation blog?
You don’t need to be an expert to spot asphalt shingle roofers who cut corners. Look for crooked shingle lines, exposed nail heads (which should be covered by the shingle above), or shingles that don’t overhang the drip edge properly. If you see old, rusty flashing around your chimney on a “new” roof, that is a major sign of poor workmanship.
What are the key safety considerations during installation?
Safety is our top priority. Our crews use fall protection systems (harnesses and ropes) on every job. We also focus on debris management—using heavy-duty tarps to protect your foundation plantings and running magnetic sweeps multiple times to catch every stray nail. We also monitor weather closely; we will never tear off more than we can dry-in before a New England rainstorm hits.
Conclusion
At Twin Roofing, we believe that a roof is more than just a house component—it is your family’s primary shield against the elements. Whether we are installing a high-performance asphalt shingle system in Billerica or a durable metal roof in Nashua, our focus remains on superior performance and quality materials.
We hope this roof installation blog has cleared up the mysteries of the process. A successful installation is the result of careful planning, the right materials, and a crew that treats your home like their own. If you are ready to protect your investment with a roof that stands the test of time, we are here to help.
Request a free estimate from Twin Roofing
Twin Roofing installs asphalt roofs across Massachusetts and New Hampshire, providing homeowners with the peace of mind that comes from expert craftsmanship and exceptional customer service.
The company services Eastern Massachusetts and Southern New Hampshire.
Follow us on Facebook — https://www.facebook.com/twinmetalsroofing Follow us on Instagram — https://www.instagram.com/twinmetals/